Thursday, January 31, 2019

Jenny Bakery Wannabe Butter Cookies

Oh no, I think it's a mistake I learned how to make these butter cookies cause they're SO ADDICTIVE and I can't stop eating them..! 😳 Welp, now that I'm down the rabbit hole, I guess the only thing left to do is share the recipe and drag you guys down with me (into buttery heaven)! Haha


This was a really fun bake for me! There aren't tons of recipes out there so I got to experiment a bit. I ended up merging two recipes together:

Couple notes on the recipe:
- You need a scale to weigh all the ingredients. Measuring cups are not accurate enough and will affect the density of the cookies. 
- You need a strong and thick piping bag. The dough is thick so the force during piping could burst the bag if they're not strong enough. 
- If you don't have salted butter (like me), just add about 1/4 tsp of salt.
- I tried using Russian piping tip and it was really difficult to make it look neat, so I resorted to the Open Star piping tip (Wilton 1M).


Thank you for reading and happy eating! - Mich

Jenny Bakery Wannabe Butter Cookies

Time: ~45 minutes
Servings: 24 cookies

Ingredients:
- 5.25 oz Salted Butter (1 stick + 2.5 TBSP) at room temperature
- 30 g Powdered Sugar
- 95 g All Purpose Flour
- 75 g Corn Starch

Instruction:
1) Preheat oven to 350 degree fahrenheit (180 degree celcius).
2) Prepare baking tray with parchment paper.
3) Cream together butter and powdered sugar at medium high speed until light and fluffy, approximately 2 minutes.
4) Sift all purpose flour and corn starch.
5) Fold the sifted flour mixture into butter sugar mixture until well incorporated. Do not beat or over mix.
6) Put the dough into a piping bag with tip.
7) Pipe the cookies into a spiral by using a circular motion from outskirt to center.
8) Bake the cookies for 15-18 minutes until light golden.
9) Let them rest for a couple minutes before moving to cooling rack.

Tuesday, January 29, 2019

Oatmeal Chocolate Chip Cookie

I'm not really a huge fan of any oaty food items. I would never choose to eat oatmeal and I definitely would never choose to eat oatmeal raisin cookies (bleh!). But chocolate chip in lieu of raisin? That changes the whole ball game. Be warned! These cookies are extremely delicious and addictive!! I'm not exaggerating, I just killed 4 of them in a minute. 😳


I found this recipe on Live Well Bake Often and it is a super easy to follow recipe. The ingredients are your everyday pantry item. I whipped this up in less than 30 minutes (not counting refrigeration time). It's the perfect recipe for a lazy day (like today when I'm snowed in and not working).


If you really do like oatmeal raisin cookies, just switch out the chips with raisins. I know I'll definitely make these with raisins in the future because Wayne loves oatmeal raisin cookies (we really aren't that compatible when it comes to sweets).

Thank you for reading and happy eating! - Mich

-------------------------

Time: ~1 hour (including chill time)
Servings: 24 cookies
Source Live Well, Bake Often

Ingredients
1 cup all-purpose flour
½ teaspoon ground cinnamon
½ teaspoon baking soda
¼ teaspoon salt
½ cup unsalted butter, softened to room temperature
½ cup brown sugar
¼ cup granulated sugar
1 large egg room temperature
1 teaspoon vanilla extract
1 and ½ cups old-fashioned rolled oats
1 cup semisweet chocolate chips

Instructions
1. Preheat oven to 350°F. Line two large baking sheets with parchment paper or silicone baking mats and set aside.
2. In a medium-sized mixing bowl, whisk together the flour, cinnamon, baking soda, and salt. Set aside.
3. In a separate large mixing bowl using an electric mixer, cream together the butter, brown sugar, and granulated sugar for about 1-2 minutes or until well combined. Mix in the egg and vanilla extract, stopping to scrape down the sides of the bowl as needed. Slowly add the dry ingredients to the wet ingredients and mix on low speed until just combined. Mix in the oats, then the chocolate chips until just combined. Cover tightly and refrigerate for at least 30 minutes.
4. Using a 1.5-2 tablespoon cookie scoop, scoop the dough onto the prepared baking sheets, making sure to leave a little room between each one. Bake in separate batches (keep the other batch of cookie dough in the refrigerator while the first batch bakes) at 350°F for 10-13 minutes or until the tops of the cookies are set.
5. Remove from the oven and cool on the baking sheet for 5-10 minutes, then transfer to a wire rack to cool completely.

Notes
- Prep time includes 30 minutes of chilling time in the refrigerator.
- Cookies will keep well in an airtight container on the counter for up to one week.
- To freeze the cookies: You may freeze the cookie dough for up to three months. Bake frozen balls of cookie dough for an additional 1-2 minutes. You may also freeze baked cookies for up to 3 months, thaw to room temperature before serving.

Thursday, January 24, 2019

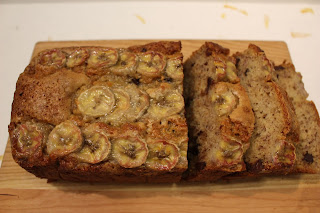
Dark Chocolate Tahini Banana Bread

Usually when you ask a couple, "Hey, what would you do differently if you could redo your wedding?" There's always something they would like to change - budget, guest list, photographer.. But not us, Wayne and I loved every aspect of our wedding so much that we would do anything to relive that amazing weekend! Huge thanks to my sister and my brother in law, they were an immense help for our wedding. Despite the jet lag (they arrived from Hong Kong the day before the wedding weekend), they took up the tasks to make desserts for our reception and breakfast for our Sunday brunch! I know, right!? How ridiculously crazy were they!? So much love for these two 💕 We're so grateful 😊

Today's post is on one of the breakfast items they've made for our Sunday brunch - banana bread! Our guests loved the banana bread so much that they wanted take a whole loaf home (I won't name names lol). This banana bread is unique because instead of using sour cream as your special ingredient, it uses tahini. Tahini is basically roasted sesame seeds. Think nut butter, it is super thick and just nutty all around. When you get a waft of this banana bread, it's pure heaven.. nutty banana heaven. My BIL found this recipe on Butter & Brioche. It's a pretty standard, easy to follow recipe. I've followed every step, with the only exception that my baking time took over an hour. It was closed to 1 hour and 20-25 minutes.


These pictures don't do the banana bread any justice! It smells so good that every time you walk pass it, you can't help but want to eat a slice. With that said.. we've pretty much killed the whole loaf, and this was made two days ago.. I know, we have a self-control problem. If you have an afternoon to spare, give this recipe a try! Let me know how you like it. I love it so much I don't know if I can go back to regular banana bread!

Here's a photo of my side of the family at our wedding :) Can you spot my sister and my brother in law? 💓😍


Thank you for reading and happy eating! - Mich


Monday, January 21, 2019

Chocolate Cupcake with Cinnamon Frosting


I made these delicious chocolate cupcakes using recipe from The Stay At Home Chef. This is an extremely easy to follow recipe, in less than an hour you've got 24 big fat delicious cupcakes in front of you. I've pretty much followed the entire recipe except for the cocoa powder. I opted (yet again) for the dutch cocoa powder instead of natural unsweetened cocoa powder because that's all I have in my pantry *shrugs* (check out my Red Velvet Cake post on the difference between the two and when to use what). The cocoa powder worked perfectly, not only did it not affect the fluffiness of the cupcake, it gave the cupcakes a super rich and dark chocolatey taste. AH I was obsessed! 

I didn't make the chocolate buttercream frosting from the recipe, instead I made cinnamon buttercream frosting. I thought it would complement the richness of the chocolate, balance the flavor out a bit, or the cupcakes might be too dense and strong in flavor. Cinnamon buttercream frosting is basically your regular buttercream frosting with ground cinnamon. I used this recipe from Two Sisters Crafting as a guide and just adjusted the ground cinnamon measurement as I go. Instead of 1 teaspoon of ground cinnamon, I used a little more than 1 Tablespoon. For some reason I could barely taste the cinnamon with just 1 teaspoon so I just kept adding until I found the taste I like. 

Frost the cupcake, top it off with some more ground cinnamon and a cinnamon stick, and here you have it - a chocolatey and cinnamony party in your mouth! 

**Cinnamon sticks are just for garnish, don't eat them lol**


What other frosting flavors do you think will go well with chocolate cupcakes? 

Thank you for reading and happy eating! - Mich


Thursday, January 17, 2019

Semi-homemade Japanese Curry Chicken

We always have Golden Curry in our pantry! It's a staple like rice and pasta here. Golden Curry is basically solidified curry in a block, all you have to do is add water to liquefy it. It is the fastest and easiest way to get some Japanese curry in your tummy.

Google
Image from Google
This makes a perfect one pot wonder meal! It is entirely up to you to choose the ingredients; you can go from 0 ingredient (just curry with rice) up to 10 ingredients if you are super ambitious. Personally, I like sticking with my basics - onions, carrots, potatoes, and one type of protein (almost always chicken). I usually cook enough portion so Wayne and I can have it for lunch because we love leftovers! To give you an idea, for two people's two meals, I use half an onion, 4 carrots, 2 potatoes, and 2 chicken breasts. This is more than enough to give you food coma after lunch!

To prep: 
1. Dice everything. I like texture so I prefer everything a bit chunky but that takes longer to cook. If you're starving and can't wait, dice them smaller so they can cook faster.
2. Marinate the meat if you have time, it makes a difference! Will share how I marinate my meat on another post, another time! 

To cook: 
1. Heat oil in a pot and cook the onion until soft.
2. Dump the potatoes and carrots in.
3. In 5 minutes, dump the protein in.
4. Stir and cook for about 10-15 minutes depending on size, then dump the curry block and water in (see instruction on the box for water ratio). 
5. Stir occasionally until cooked. 
**(Don't forget to cook rice on the side!) **

This is pretty much the basic instruction on how to make box curry. It's simple and quick!

You can either end here, or you can do what I do and play with the flavor a bit. The reason I do that is because I find Golden Curry a good base for Japanese curry, but not the best tasting out there in my opinion. So what I do is I use curry powder, soy sauce, sugar, and sriracha and just start adding and mixing until I get to the taste I like. My advice is to do a bit at a time cause you don't want any condiment to overpower and ruin the taste, plus you don't want to mess with the curry texture and thin it out or thicken it too much.


Let me know if you guys cook this in other ways! My next challenge is to cook the curry with tonkatsu (Japanese fried pork chop)! 

Thank you for reading and happy eating! - Mich

PS. Here's a behind the scene with my favorite lighting fixture/person/husband lol


Monday, January 14, 2019

I Love Every Layer of this Red Velvet

I made a 3 layer red velvet cake for my sweet Yoojin's bridal shower last week!


I used the recipe from Sally's Baking Addiction - Red Velvet Cake with Cream Cheese Frosting. It was a relatively easy recipe to follow and the cake did come out moist and yummy as she claims it! I did have to change a couple things to fit what I had in my pantry and my vision for the cake. So here's what I did differently:

1. Instead of cake flour, I used all purpose flour. Yes, I know, the recipe strongly urges you to use cake flour. However, I've made the mistake of buying cake flour before and I had absolutely no use for it after the one recipe that called for it. It ended up going to waste. Therefore, I chose to use substitution in my red velvet cake - 2 and 2/3 cups all purpose flour + 1/3 cup cornstarch in lieu of 3 cups cake flour. Just make sure everything is sifted if you choose to use this substitution! 

2. The recipe calls for natural unsweetened cocoa powder. Surprisingly, I don't have that in my pantry and instead, I have dutch process cocoa powder. I didn't even think twice and opted for that. It wasn't until this blog post that I researched the difference and understood how it might affect a baked good's leaven if I don't use what the recipe called for. Ultimately, if a recipe calls for baking soda, use natural and if a recipe calls for baking powder, use dutch. It didn't affect the taste that much, but I was worried it was too thin when I took it out of the oven. Anyways, if you're interested in the food science detail, here's the link to the site I read up on.

3. The recipe calls for 3 Tablespoons of food coloring but I only used 2 Tablespoons because that's all I had left.. I think it turned out fine! 

4. The recipe makes about 6 and 3/4 cups of batter. How do I know? I had to painstakingly scoop one cup at a time into a new bowl so I know how to split it up for my 3 layer cake! I hope this is helpful information for you because every time I bake a layer cake, I struggle with knowing how much to put into the cake pan evenly. 

5. I used roughly 3 cups instead of 4 cups of confectioners' sugar for the frosting. I don't think there's an easy way to know if your frosting is at its perfect texture or not. It mostly comes from practices and experiences. One trick I did learn is to touch your frosting lightly using your index finger and if the frosting is not sticking to your finger, you need to soften it by adding some liquid. If it's too soft and sticking too much to your finger, you need to add confectioners' sugar to create a thicker texture. In this case. 3 cups of confectioners' sugar worked for me! 

One more thing I've learned from this process is to be more generous when it comes to frosting. I was so conservative with the in between layer frosting that you could barely see and taste it. Nonetheless, the cake completed the dessert table and was very much loved by many of the guests, including the soon-to-be bride herself! She even broke her Keto diet just so she can eat it! Haha. 


Thank you for reading and happy eating! - Mich

PS. Found this adorable food pun illustration by Tastemade!